 how-to
Electric Water Heater Not Heating? 7 Fixes to Try Now
Table of Contents
- Why Your Electric Water Heater Is Not Heating Water
- Step 1: Check the Power Supply and Circuit Breaker
- Step 2: Locate and Reset the Water Heater Reset Button
- Step 3: Test the Thermostats and Check Their Settings
- Step 4: How to Test the Water Heater Heating Element
- Step 5: Flush the Tank to Remove Sediment Buildup
- Water Heater Circuit Breaker Keeps Tripping: What to Do
- When to Call a Licensed Plumber
- Frequently Asked Questions
Last Updated: September 9, 2026
Why Your Electric Water Heater Is Not Heating Water
A cold shower is often the first sign that your electric water heater is not heating water properly, and it usually points to one of a handful of fixable issues rather than a complete failure. The most common culprits are a tripped circuit breaker, a failed heating element, a faulty thermostat, or a triggered high-limit reset button. This guide from Metro Repair Plumber walks you through the diagnostic steps in order.
An electric water heater is a relatively simple appliance: two heating elements, two thermostats, and a safety switch work together to heat the water in your tank. When any part of that chain breaks, you lose hot water. Many of these failures are straightforward to diagnose with basic tools, and some are even safe for a handy homeowner to fix.
Step 1: Check the Power Supply and Circuit Breaker
The first thing to verify is that your water heater is actually receiving power, because a tripped breaker is the single most common reason an electric water heater stops heating. Go to your electrical panel and locate the breaker labeled for the water heater; it is typically a double-pole 30-amp breaker. If it has tripped to the middle or off position, reset it by pushing it firmly to the off position first, then back to the on position.
If the breaker will not stay on, or if it trips again immediately, do not keep resetting it. A breaker that repeatedly trips indicates a short circuit, a grounded heating element, or a wiring problem inside the unit. According to guidance from the U.S. Consumer Product Safety Commission on electrical safety, repeatedly resetting a tripped breaker without finding the cause creates a fire hazard. You will need to move on to testing the components, and if the issue is not obvious, this is the point where a professional should take over.
Step 2: Locate and Reset the Water Heater Reset Button
If power is flowing correctly, the next suspect is the high-limit reset button, often called the ECO button, which trips when the water inside the tank gets too hot. The water heater reset button location is on the upper thermostat, behind one of the two access panels on the side of the tank. Use a screwdriver to remove the panel, and peel back some insulation to see the thermostat and the red reset button beneath it.
Press the red button firmly until you feel it click, then replace the panel and give the unit about 30 minutes to reheat. If the button trips again soon after, it is usually a sign of a failing thermostat or a grounded heating element rather than a one-time glitch.
Step 3: Test the Thermostats and Check Their Settings
The thermostats control the temperature of the water, and a misadjusted or failed thermostat can leave you with lukewarm or cold water. Check the temperature dials on both the upper and lower thermostats; they should be set to the same temperature, typically around 120 degrees Fahrenheit.
To test whether a thermostat is functioning, you will need a multimeter set to measure voltage. With the power on, check that you are getting 240 volts across the two power wires coming into the thermostat. Then, turn the power off and perform a continuity test across the thermostat terminals. If the thermostat shows no continuity when it should be closed, it has failed and needs to be replaced. This requires comfort with live electrical testing, so if you are not experienced with a multimeter, call a professional.
Step 4: How to Test the Water Heater Heating Element
When the power supply and thermostats check out, the heating elements themselves are the most likely cause.
An electric water heater has two elements: an upper element that heats the top portion of the tank and a lower element that handles the rest. If you are getting a small amount of hot water but not a full tank, the upper element is often the culprit; if the water is completely cold, the lower element is the usual suspect. There are two distinct failure modes to test for:
1. Burned-Out Element (Open Circuit) This is the most common failure. The resistive wire inside the element eventually breaks, usually due to age or sediment buildup. To test for this, turn off the power at the breaker and drain the tank below the element access point. Disconnect the two wires from the element terminals, then set your multimeter to the ohms (Ω) setting. Touch one probe to each terminal. A healthy element will show a resistance reading between 10 and 30 ohms depending on its wattage rating (a 3,500-watt element typically reads around 16-18 ohms; a 4,500-watt element reads around 12-14 ohms) (homedepot.com). A reading of zero (short) or infinity (open) means the element is burned out and must be replaced.
2. Grounded Element (Short to Tank) This is the failure that trips your circuit breaker. Over time, mineral scale or a manufacturing defect can create a path for electricity to leak from the element's internal wire to the outer metal sheath, and from there to the tank itself. To test for this, keep the multimeter on the ohms setting. Touch one probe to either element terminal and the other probe to the metal tank body or the element's mounting flange. Any reading other than infinity (OL on most meters) indicates a grounded element. Even a reading of 0.5 ohms is enough to trip a GFCI breaker or a standard breaker under load. This element is dangerous and must be replaced immediately.
The 'New Unit' Failure Scenario: Dry Firing If you installed a new water heater or replaced an element recently and it failed within days or weeks, the likely cause is a dry fire. This happens when the tank is not completely full of water before power is restored. The element heats up to over 1,000°F in seconds without water to absorb the heat, and the internal wire melts or breaks almost instantly. A dry-fired element will show an open circuit (infinity) on your multimeter. The fix is simple: always open a hot water faucet in the house until a steady stream of water flows before flipping the breaker back on after any drain or element replacement. If you dry-fired a brand-new element, it is not covered under warranty in most cases, the manufacturer considers it installer error.
Hard Water and Element Lifespan If you live in a region with hard water (typically above 7 grains per gallon, or 120 mg/L of calcium carbonate), your elements will fail faster than in soft-water areas. The dissolved minerals precipitate out as scale when the water is heated, and that scale coats the element. Scale acts as an insulator, so the element must run hotter to transfer heat to the water, which accelerates burnout. In extreme hard-water areas, elements can fail in as little as 18-24 months, versus 8-12 years in soft-water regions. If you are replacing an element and your tank shows heavy scale buildup, flushing the tank (see Step 5) and considering a sacrificial anode rod inspection are essential.
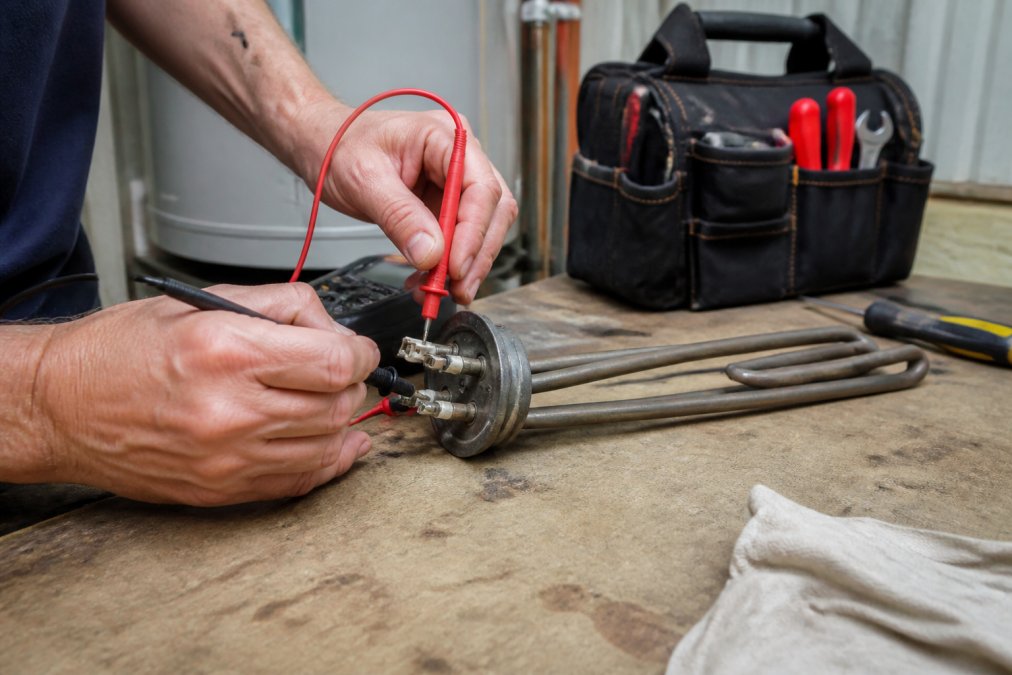
If both elements test healthy (proper resistance and no ground fault), but you still have no hot water, the problem is almost certainly upstream, in the thermostat, the wiring, or the breaker itself. Move to the thermostat testing procedure in Step 3, or call a licensed electrician to inspect the circuit from the panel to the heater.
Step 5: Flush the Tank to Remove Sediment Buildup
Sediment buildup is a gradual killer of electric water heaters, and it is especially common in regions with hard water where dissolved calcium and magnesium settle out as scale when the water is heated. Over time, this layer of mineral deposits acts as an insulator between the lower heating element and the water, forcing the element to run hotter and longer to achieve the same temperature. The result is a slow death: the element burns out prematurely, the tank develops hot spots that can weaken the steel, and you may notice rumbling or popping sounds as steam bubbles escape from under the sediment layer.
How Sediment Causes 'No Hot Water' Beyond element failure, a thick sediment layer at the bottom of the tank can cause the lower thermostat to sense the heat trapped in the scale rather than the water temperature above it. This can cause the thermostat to shut off the lower element prematurely, leaving you with a tank full of lukewarm water. In severe cases, the sediment can bridge the gap between the lower element and the tank wall, creating a ground fault that trips the breaker.
The Full Flushing Procedure To flush the tank properly, follow these steps in order:
- Turn off the power at the circuit breaker. Do not rely on the thermostat dial, the upper element can still be energized.
- Turn off the cold water supply valve on top of the tank.
- Open a hot water faucet in the house (nearest to the heater) to relieve pressure and allow the tank to drain.
- Attach a garden hose to the drain valve at the bottom of the tank and route it to a floor drain or outside. Ensure the hose is rated for hot water.
- Open the drain valve and let the tank drain completely. This can take 20-30 minutes for a 50-gallon tank.
- Close the drain valve, then open the cold water supply for 10-15 seconds. This stirs up the remaining sediment at the bottom. Close the supply, open the drain valve again, and let the murky water run out.
- Repeat step 6 until the water runs clear. In hard-water areas, you may need 3-4 cycles to clear a heavy buildup.
- Close the drain valve, remove the hose, and open the cold water supply to refill the tank.
- Open a hot water faucet in the house and let it run until a steady stream of water flows, this purges air from the tank.
- Restore power at the breaker only after the tank is completely full. Turning on power to an empty or partially filled tank will dry-fire the upper element and destroy it instantly.
The Anode Rod Connection While you have the tank drained, it is worth checking the sacrificial anode rod, a metal rod (usually magnesium or aluminum) that corrodes in place of the tank's steel lining. If the rod is completely consumed (you can see only a thin wire core), the tank is now vulnerable to rust and will eventually leak. Replacing an anode rod every 3-5 years is far cheaper than replacing the tank. In hard-water areas, the rod depletes faster, so check it annually.
Water Quality and Flush Frequency The standard advice is to flush once a year, but that assumes average municipal water. If you are on well water or in a region with hard water (typically above 7 grains per gallon, common across the Midwest and Southwest), you should flush every 6 months. A simple test: if your showerheads and faucets show white scale buildup, your water is hard enough to justify a more aggressive maintenance schedule. Conversely, homes with a whole-house water softener can often extend the flush interval to 18-24 months.
If you flush the tank, replace a failing element, and still have no hot water, the issue is not sediment, it is electrical. Move to the thermostat and wiring checks in Steps 3 and 4, or call a licensed plumber to inspect the unit.
Water Heater Circuit Breaker Keeps Tripping: What to Do
A water heater circuit breaker keeps tripping for a reason, and ignoring it can lead to damage or a safety hazard. The most frequent causes are a grounded heating element, a short in the wiring connections, or a failing thermostat that is drawing too much current.
To diagnose a tripping breaker, you will need to test the heating elements and thermostats as described in the previous steps, because a grounded element is the number one cause. If all components test as healthy, the problem may lie in the wiring between the panel and the heater, or the breaker itself may be worn out. This is a situation where professional help is strongly recommended, since working inside the electrical panel carries real risk.
When to Call a Licensed Plumber
Many of these fixes are safe for a confident DIYer, but there are clear signs that you should stop troubleshooting and call a professional. If you have tested the elements and thermostats and found them functional, yet the water is still cold, the issue may be internal wiring or a failing control board that requires expert diagnosis. Similarly, if your breaker continues to trip after you have replaced a grounded element, there is likely a deeper electrical issue that needs a licensed hand.
For homeowners in North Dallas, Metro Repair Plumber offers licensed, insured, and background-checked technicians who can diagnose and repair any water heater issue. Every job starts with a written quote before work begins, so there are no surprise charges or hidden fees, and our team is committed to protecting your home and floors throughout the service. If you are facing a cold tank or a breaker that will not stay on, Texas State Board of Plumbing Examiners guidance on hiring licensed plumbers confirms that working with a licensed professional ensures the job meets state standards. Chat with us to get your hot water back, with a satisfaction guarantee that we will make things right if the job is not done correctly the first time.
The most common reasons an electric water heater is not heating water are a tripped breaker, a failed element, or a bad thermostat, and each has a clear diagnostic path. Working through these steps in order will resolve most issues, but when the problem is persistent or involves live electrical components, professional help is the safest choice. Metro Repair Plumber provides fast, reliable service with transparent pricing and a promise to leave your home cleaner than we found it. Chat with us today and get your hot water flowing again.
Frequently Asked Questions
What is the first thing to check when there is no hot water?
Start by checking the circuit breaker for the water heater in your electrical panel. A tripped breaker is the most common cause of a suddenly cold tank. If the breaker is in the 'off' or middle position, reset it by firmly pushing it to 'off' and then back to 'on'. If it trips again immediately or soon after, you likely have a shorted heating element or a wiring problem, not just a simple reset.
How do I know if my water heater heating element is bad?
You can test the element with a multimeter set to measure ohms of resistance. First, turn off the power at the breaker. Remove the access panel, insulation, and plastic cover to expose the element terminals. Touch one probe to each terminal. A good element will show a reading between 10 and 30 ohms. A reading of zero or infinity (OL) means the element is burned out and needs replacement.
Is it dangerous to fix an electric water heater yourself?
Working on an electric water heater involves high voltage and carries a risk of electric shock. Always turn off the power at the circuit breaker and use a voltage tester to confirm the power is off before touching any wires or components. If you are not comfortable working inside an electrical panel or are unsure about any step, stop and call a licensed plumber to handle the repair safely.
Why is my water heater running but I'm not getting hot water?
If you hear the tank running but the water is cold, the heating elements are likely not working. This is often due to a burned-out element or a tripped high-limit reset button. If the tank is making rumbling or popping noises, sediment buildup at the bottom could be insulating the water from the lower element. Flushing the tank can resolve the noise and improve heating performance.